Tips For Adding The Clips Of Hair Topper
If you’re one of the many women struggling with thinning hair, a hair topper can be a game-changer. But what happens when your hair topper for thinning hair doesn’t stay put? For me, my front hair is thin and wispy (thanks to a receding hairline), so those clips had little to grip. That’s when I decided to add extra clips for more security. Below, I’ll walk you through exactly how I did it, step by step.

Why I Needed to Add Extra Clips to My Hair Topper
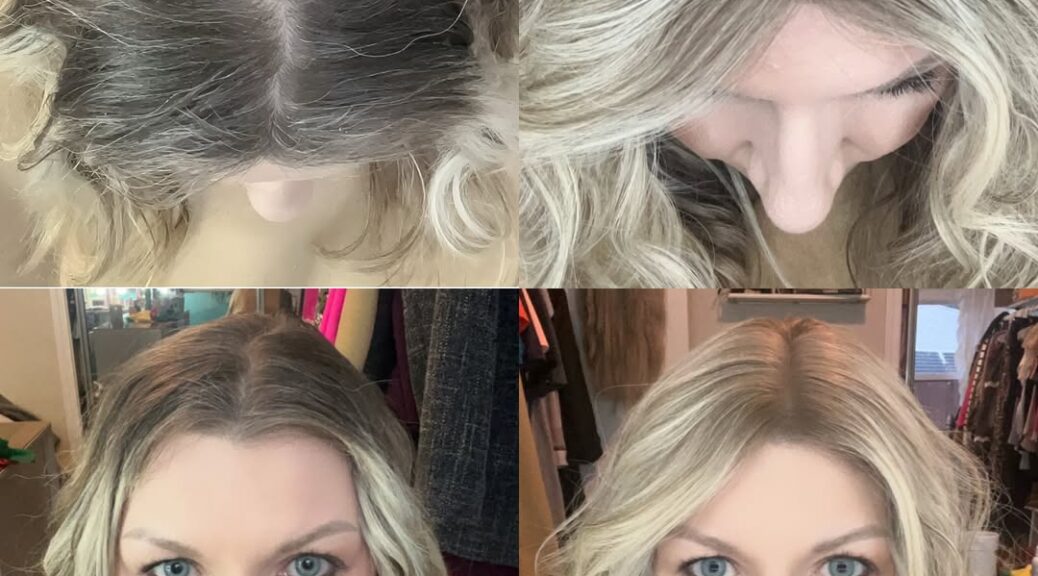
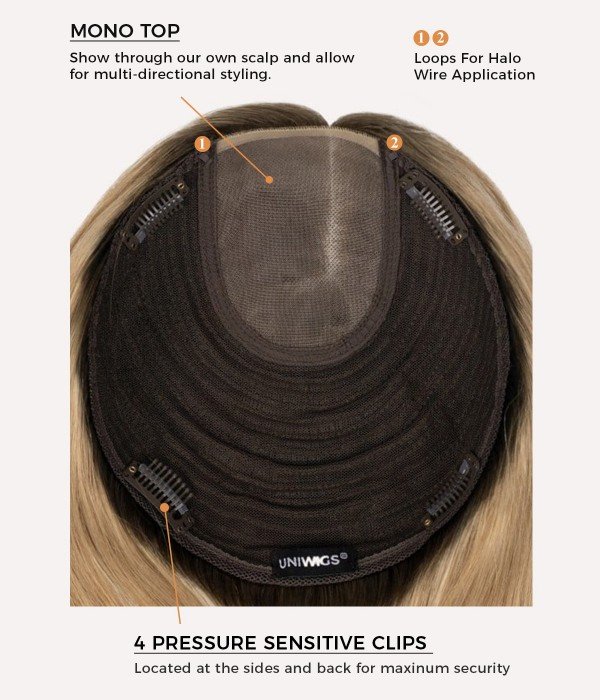
Let’s start with the basics: a hair topper for women only works if it’s secure. My UniWigs Courtney hair topper (shade: Dusty Ash Brown, length: 14 inches) came with four pre-sewn clips—two at the front and two at the back. For the first few weeks, it stayed in place perfectly. But once Christmas and New Year rolled around, all the hugging changed things.Friends and family would wrap their arms around me, and even a gentle pull would make the front of the hair topper shift. The back clips were fine—they had enough of my natural hair to grip. But the front? My thinning hair there meant the clips had almost nothing to hold onto. If you have a hair topper for thinning hair, you know this struggle: a loose topper doesn’t just look unflattering—it makes you self-conscious all day.I didn’t want to replace the topper (it’s still in great shape!), so adding extra clips seemed like the easiest, most affordable fix. The goal? Keep the original front clips (they still grabbed some hair) and add two more nearby to boost security.
What You’ll Need to Add Clips to Your Hair Topper
Before you start, gather these simple supplies. You don’t need to be a seamstress—just basic tools will do:
- A hair topper (mine is the UniWigs Courtney, but this works for any style)
- 2 extra pressure-sensitive clips (matching your topper’s base color is ideal)
- Cotton thread (choose a shade that blends with your topper—light brown worked for my Dusty Ash Brown)
- A sewing needle (sharp but not too thick, to avoid damaging the topper’s base)
- Small scissors (for cutting thread)
- A flat surface (to lay your topper on while working)
Pro tip: If you’re using a hair topper for thinning hair, opt for clips with gentle teeth—they’ll grip your natural hair without pulling.
Step-by-Step Guide to Adding Clips to Your Hair Topper
Follow these steps to add clips safely and securely. I’m not a pro at sewing, but this method worked for me—and it will work for you too!
Step 1: Prep Your Hair Topper
First, lay your hair topper flat on a clean surface. Smooth out the base so there are no wrinkles—this will make sewing easier.
Step 2: Position the Clips (The Right Way!)
This is crucial: clips have a “right side” and a “wrong side.” The side with the eeth should face upwards (towards you) when you place it on the topper’s base. If you sew it upside down, it won’t grip your natural hair. For my hair topper for thinning hair, I placed the two new clips just slightly behind the original front clips. This way, they could grab the thicker hair at the back of my front section (since my hairline is thinner). You can adjust the position: if your thinning is at the back, add clips there instead!
Step 3: Thread Your Needle and Tie a Knot
Cut a length of thread long enough (about 12 inches: enough to work with, but not too long to tangle). Thread it through the needle, then tie a small knot at the end. This knot will keep the thread from pulling through the topper’s base.
Step 4: Sew the Clip to the Topper’s Base
Now it’s time to sew! Start from underneath the topper’s base—push the needle up through the base, right next to one of the clip’s holes. Be careful not to pull any of the topper’s hair through the base.I used a basic “in-and-out” stitch:
- Push the needle up through the base and through one hole in the clip.
- Pull the thread tight (but not too tight—you don’t want to distort the topper’s wefting).
- Push the needle back down through the next hole in the clip and into the base.
- Repeat this until the clip feels secure. I did 3-4 stitches per hole to make sure it didn’t come loose.
Step 5: Finish the Stitch and Cut the Thread
Once the clip is secure, tie a small knot at the back of the base (underneath the topper) to lock the thread in place. Trim any excess thread with scissors—leave a tiny tail (about ½ inch) so the knot doesn’t come undone.Repeat this process for the second clip. Don’t stress if your stitches look messy—no one will see them when you wear the hair topper!
Testing the Secure Fit of Your Updated Hair Topper
After adding the clips, it’s time to try on your hair topper and check the security. Here’s how I tested mine:
- Put it on like normal: Start with the front clips (original and new). Open them, scoop a small section of your natural hair into each clip, and snap them closed. Then do the back clips. Take your time—make sure each clip has enough of your bio hair to grip. If a clip feels loose, open it and add more hair.
- Brush through: A quick test: run a brush through your hair (and the topper). If the topper stays put, you’re good to go. If it shifts, adjust the clips—you might need to add more hair to a loose clip.
- Hug test: For me, this was the real test! Ask a friend or family member for a hug (like the holiday hugs that caused my problem). Before adding the clips, the topper would slant—now, it didn’t move at all.
Bonus Tips for Your Hair Topper (Especially if You Have Thinning Hair)
Adding clips isn’t the only way to make your hair topper for women more secure. Here are a few extra tricks:
- Reposition old clips: If a pre-sewn clip is over a bald spot or thin area, undo the stitching and move it to a section with more hair.
- Use hairspray: A light spritz of hairspray on your natural hair (before putting on the topper) can help the clips grip better.
- Avoid tight styles: Pulling the topper (or your hair) into a tight ponytail can loosen clips—stick to loose styles for all-day security.
Final Thoughts
A hair topper should make you feel confident, not worried about it slipping. For me, adding two extra clips to my UniWigs Courtney hair topper for thinning hair was a simple fix that made a huge difference. You don’t need sewing skills—just patience and the right tools.If your topper is slipping, give this method a try. And remember: every woman’s hair is different—adjust the clips to fit your hair’s needs. Now, I can hug friends and family during holidays (or any day!) without stressing about my topper. You can too!
7" x 8" Upgrade Courtney Mono Top Human Hair Topper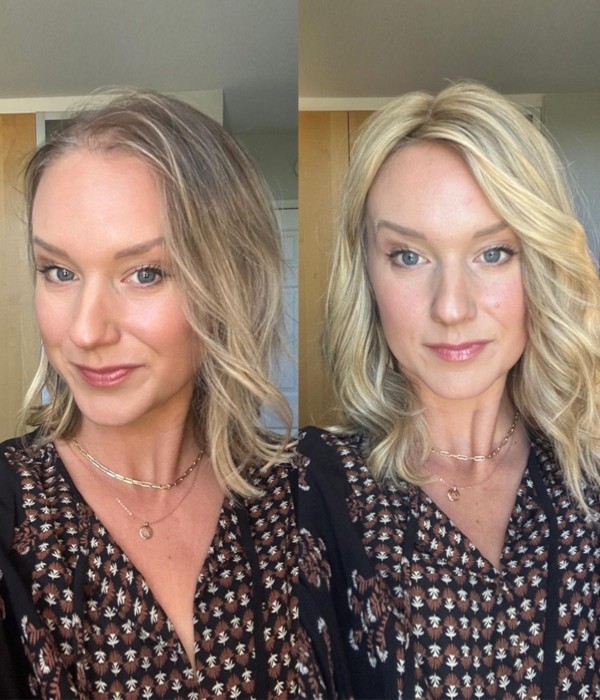
7” x 8” Upgrade Courtney Mono Top Human Hair Topper